Nginx is a high-performance web server and It’s much more flexible and lightweight program than Apache Server.
We are going to install MariaDB instead of MySQL, you might ask why? MariaDB is a community-developed fork of the MySQL, and it’s led by MySQL developers. MariaDB maintains high compatibility with MySQL and It’s very smooth and lightweight.
We are assuming that you have root permission, otherwise, you may start commands with “sudo”.
Install Nginx
for installing Nginx you have to add a custom repository to your CentOS. in this tutorial we are using “epel”
yum install epel-releaseyum install nginxsystemctl start nginxfirewall-cmd --permanent --zone=public --add-service=httpfirewall-cmd --permanent --zone=public --add-service=httpsfirewall-cmd --reload
systemctl enable nginxInstall MariaDB
Again we can use “yum” to install MariaDB.
yum install mariadb-server mariadbWhen the installation is complete, we have to start MariaDB with the following command:
systemctl start mariadbFor building a secure database you should change some settings and set a root password:
mysql_secure_installationThe prompt will ask you for your current root password. Since you just installed MariaDB, you most likely won’t have one, so leave it blank by pressing enter. Then the prompt will ask you if you want to set a root password. Go ahead and enter “Y", then it’s recommended to answer all questions with “y”.
The last thing you will want to do is enable MariaDB to start on boot. Use the following command to do so:
systemctl enable mariadbInstall PHP
We’re going to include the php-mysql and php-fpm packages as well:
yum install php php-mysql php-fpmNext, you have to open the php-fpm configuration file:
nano /etc/php-fpm.d/www.conf
Find the line that starts with “listen” and change it like below:
listen = /var/run/php-fpm/php-fpm.sockNext, find the lines that refer to “listen.owner” and “listen.group”. then uncomment them like below:
listen.owner = nobody
listen.group = nobody
Lastly, find the lines that are referring to “user” and “group” and change their values like below:
user = nginx
group = nginx
Then save and exit.
Now we just need to start the php-fpm service:
sudo systemctl start php-fpmYou probably want to set your php to run at startup. type following command to do so:
systemctl enable php-fpmConfigure Nginx to process PHP pages
For doing that you have to change some values in nginx configuration file.
you should open configuration file with your editor, we are using “nano”
nano /etc/nginx/conf.d/default.confThen you have to change the whole configuration to get something like:
(you have to replace the “server_domain_name_or_IP” section to your own domain or public IP address)
server {
    listen       80;
    server_name  server_domain_name_or_IP;

    # note that these lines are originally from the "location /" block
    root   /usr/share/nginx/html;
    index index.php index.html index.htm;

    location / {
        try_files $uri $uri/ =404;
    }
    error_page 404 /404.html;
    error_page 500 502 503 504 /50x.html;
    location = /50x.html {
        root /usr/share/nginx/html;
    }

    location ~ \.php$ {
        try_files $uri =404;
        fastcgi_pass unix:/var/run/php-fpm/php-fpm.sock;
        fastcgi_index index.php;
        fastcgi_param SCRIPT_FILENAME $document_root$fastcgi_script_name;
        include fastcgi_params;
    }
}
When you made the above changes, you can save and exit.
Restart the Nginx to make the necessary changes
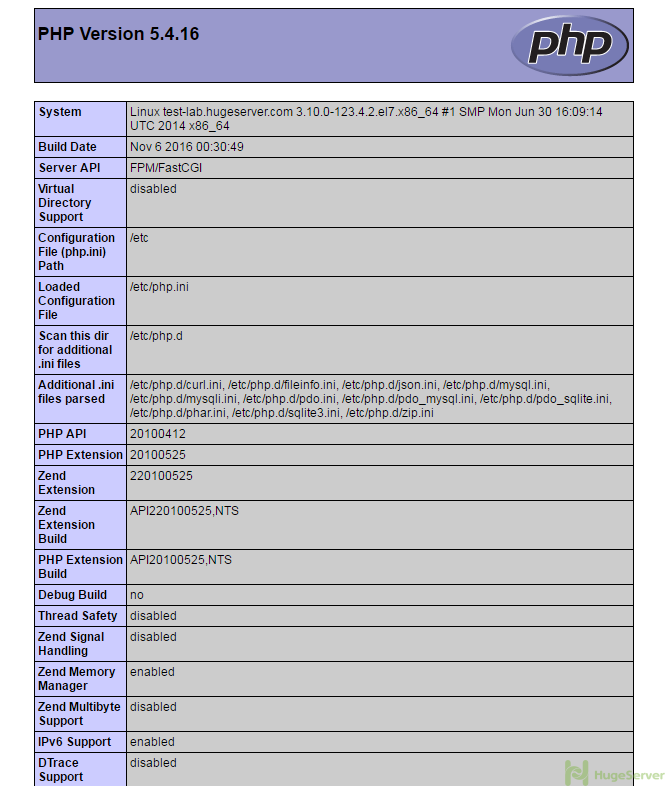
systemctl restart nginxFinally, it’s time to test your PHP. to do so follow the instructions below:
You have to create a file known as “php.info” in the specific location by the command below:
nano /usr/share/nginx/html/info.phpThis will open a blank file. We want to put the following text, which is valid PHP code, inside the file:
<?php phpinfo(); ?>When you are finished, save and close the file.
Now you have to open your browser and see your domain or your public IP address. you should see something like the picture below: