Introduction
Monit is a free open source utility for managing and monitoring, processes, programs, files, directories and filesystems on a UNIX system. Monit conducts automatic maintenance and repair and can execute meaningful causal actions in error situations, for example, Monit can prevent your services from getting stopped.
Below are some of the main benefits of using Monit:
- Automatic process maintenance in a lightweight package.
- Capability to act on out-of-bounds values for CPU, RAM, disk, file size, age and more.
- Monitoring of running services, and the ability to start, kill or restart.
- Automatic email alerts sent at event triggers.
- Web interface for status monitoring.
Install Monit
For installing Monit you need to add the EPEL repository first:
yum install epel-releaseAfter that you can install Monit easily using:
yum install monitAfter the installation process is finished, you can execute the following commands to start Monit service and make it run at startup:
systemctl start monitsystemctl enable monit
You can check your Monit service status with the command below:
systemctl status monitYou can set your preferred Email address to get alerts and reports from Monit with the following command:
set mailserver mail.example.com port 25set alert [email protected]
Initial Configuration
For doing some configuration you need to open your Monit global configuration file with the command below:
nano /etc/monitrcEnable the web interface
In the Monit global configuration file, scroll down to the following block:
set httpd port 2812 and
use address localhost # only accept connection from localhost
allow localhost # allow localhost to connect to the server and
allow admin:monit # require user 'admin' with password 'monit'
By default, Monit only listens on “localhost” and only answers to “localhost” as well, So if you want to be able to connect to your Monit interface from anywhere, you have to comment the following lines:
set httpd port 2812 and
#use address localhost # only accept connection from localhost
#allow localhost # allow localhost to connect to the server and
allow admin:monit # require user 'admin' with password 'monit'
Make sure to change your username and password to something strong like below:
set httpd port 2812 and
#use address localhost # only accept connection from localhost
#allow localhost # allow localhost to connect to the server and
allow MonitAdmin:5PbTLadz # require user 'MonitAdmin' with password '5PbTLadz'
Now you can visit your Monit web interface at the following address:
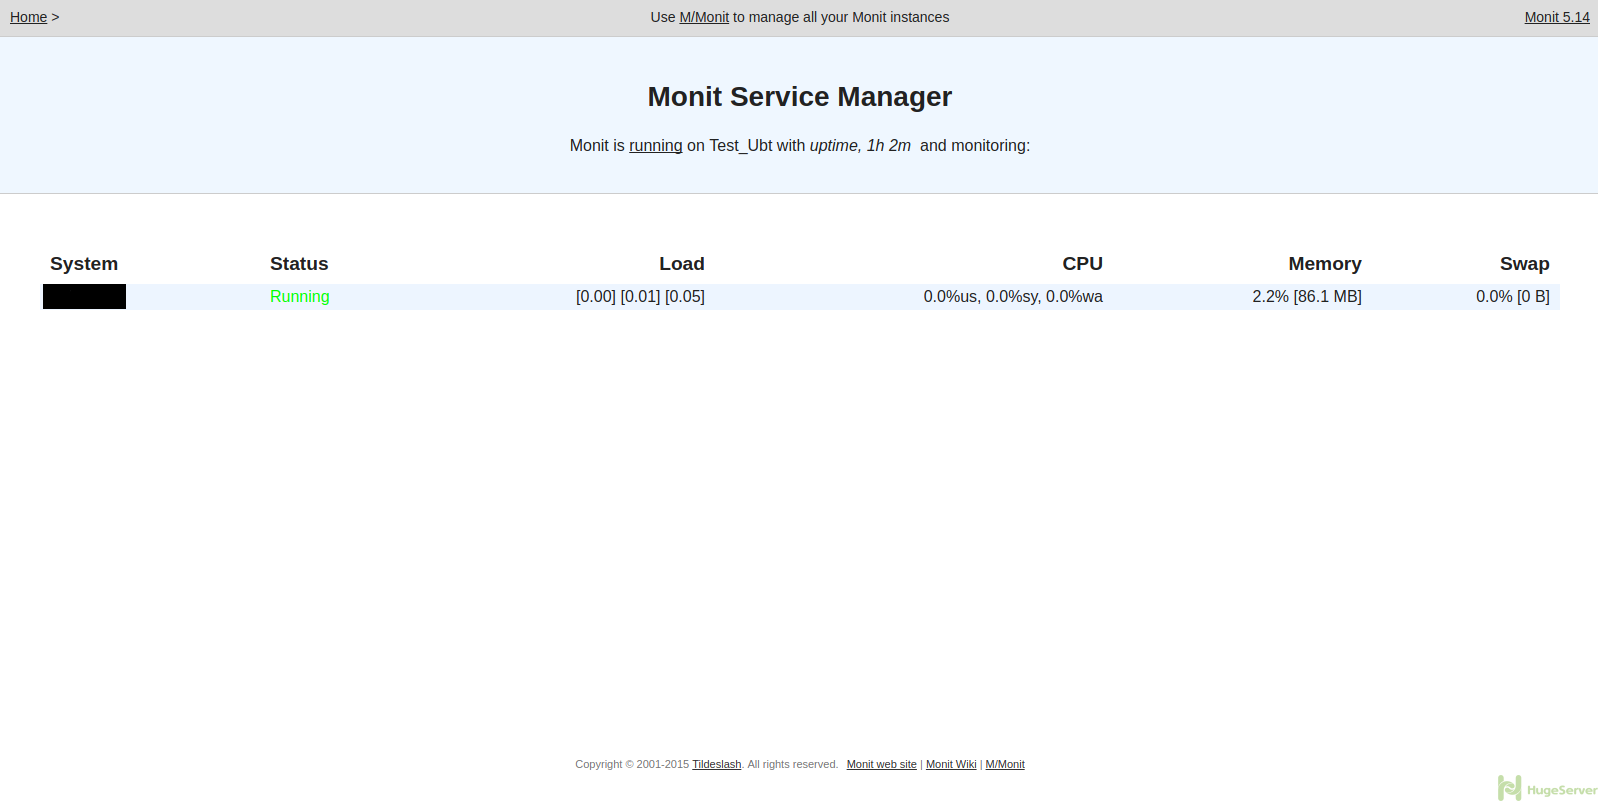
http://IP_OR_DOMAIN:2812You will see a page like below:
Configuring Programs Self-Monitoring
Now it’s time to set some services and processes to be monitored by Monit. You can scroll down the “monitrc” file to see the examples of configurations, but all of them are commented, so leave them be and add your own configurations at the very end of the file. in this section, we are going to configure Monit to prevent your services from being stopped. (Make sure to change the red parts with your own values, the “pid” files locations for each software could be different)
Apache
check process apache with pidfile /run/httpd.pid
    start program = "/etc/init.d/httpd start" with timeout 60 seconds
    stop program  = "/etc/init.d/httpd stop"
MySQL
check process mysqld with pidfile /var/run/mysqld/mysqld.pid
    start program = "/etc/init.d/mysql start"
    stop program = "/etc/init.d/mysql stop"
Nginx
check process nginx with pidfile /var/run/nginx.pid
    start program = "/etc/init.d/nginx start"
    stop program = "/etc/init.d/nginx stop"
After making changes check the syntax of your configuration file for errors:
monit -tYou should see the following output:
Control file syntax OKThen restart the Monit service to take effect and start working:
systemctl restart monitmonit start all
You can check out Monit official website for more information and news!