SSH (Secure Shell) is an encrypted protocol that is way more secure than Plain text based protocols like Telnet, however, it’s could be vulnerable if not configured properly.
We are assuming that you have root permission, otherwise, you may start commands with “sudo”.
We are going to provide 4 simple tips to get a more secure SSH protocol on your CentOS server.
Changing SSH Port
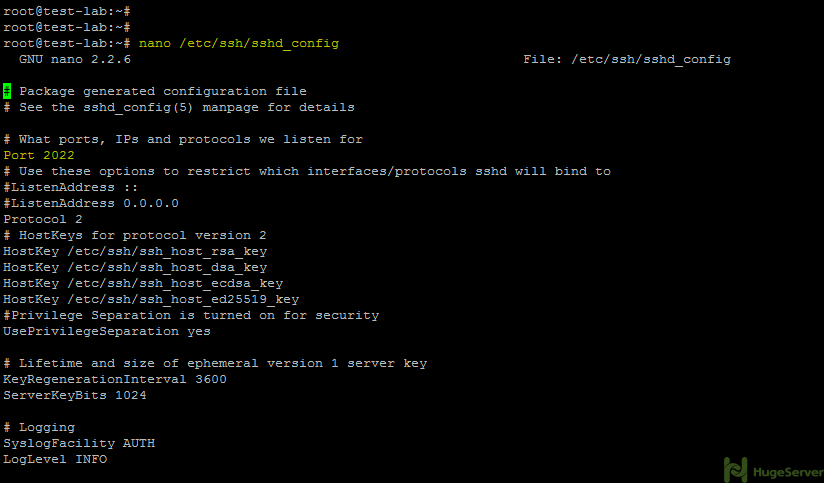
To change the Standard listening Port, you have to change the SSH Server configurations with the command below. We are using nano editor in this tutorial, you may use your own editor if you wish.
nano /etc/ssh/sshd_configThen you need to edit the line that refers to the port number, for that you have to follow the instruction below.
Then change the port number from 22 to your preferable port (e.g. 2022) And press Ctrl +O and Ctrl +X in order to save and exit.
What you need to do is enable the newly created port through Firewall to do that follow the instructions below.
semanage port -a -t ssh_port_t -p tcp 2202If you run the command above and get an error that semanage command not found, run the commands below to install it.
yum install policycoreutils-pythonAnd then run the semanage command again to allow the new port
After that you need to allow the new port through the firewall with the command below:
firewall-cmd --permanent --zone=public --add-port=2202/tcp firewall-cmd --reload systemctl restart sshd.serviceDisable root logins
You’ll be adding a layer of security to your SSH server if you disable root user logins. It would be more secure to brute force attacks or in case your password is stolen.
First, you need to create a non-root user with the following instructions:
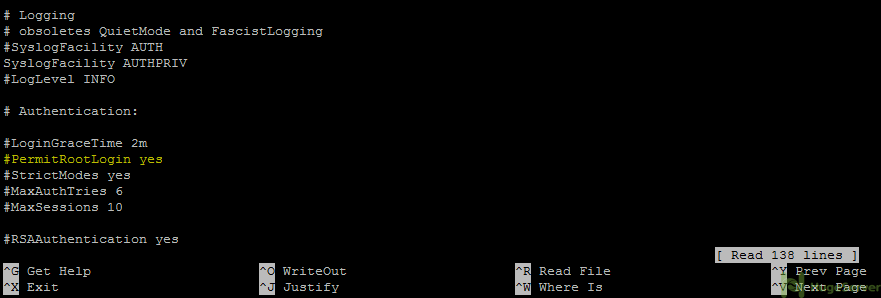
adduser username passwd usernameThen open the ssh configuration file with your editor. (we are using nano)
nano /etc/ssh/sshd_configThen change the Highlighted line from “PermitRootLogin yes” to “PermitRootLogin no”
Crtl+O Crtl+X
systemctl restart sshd.serviceCreate a key-based Authentication SSH connection
If your Server is accessible over the Internet, you can use public key authentication instead of passwords, because SSH key authentication with password phrase is way more secure than password-only authentication, while a password can eventually be cracked with a Brute-force attack or keyloggers.
Depending on your client OS you should follow the instructions to create a pair of authentication keys.
If you are using Windows:
You have to download the Putty key generator (a.k.a Puttygen)
Here is the recommended download link:
http://www.chiark.greenend.org.uk/~sgtatham/putty/latest.html
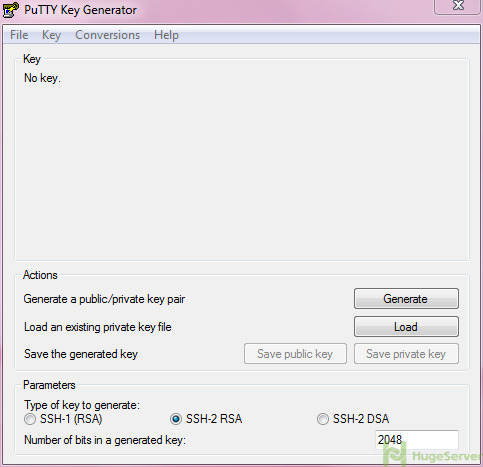
- Open PuTTYgen utility.
- For Type of key to generate, select SSH-2 RSA
- In the Number of bits in a generated key field is refer to how complicated you want your key to be, you can change the value between 2048 to 4096 for make more complicated key.
- After selecting your settings click on Generate to start Process.
- Move your mouse pointer around in the blank area of the Key section, below the progress bar (to generate some randomness) until the progress bar is full.
- A private and public key pair has now been generated.
- (Optional): it’s also recommended to set a passphrase for your key.
- Save Private and Public keys
CAUTION: be careful with choosing the path you saving the keys, if you lose them and username/password logins are disabled on your server, you might lose your access to your server.
- Then open your Putty, expand the SSH category and click on “Auth”
- In “private key file for authentication” browse your Private key.
- Finally, you should copy the Public key file in your server in this path: ~/.ssh/authorized_keys
~/.ssh/authorized_keysIf you are using Linux
–To generate an RSA key pair
ssh-keygen -t rsa- Accept the default file location of /.ssh/id_rsa. Entering a passphrase is recommended
- The public key is written to ~/.ssh/id_rsa.pub The private key is written to ~/.ssh/id_rsa
- Copy the contents of ~/.ssh/id_rsa.pub from client system into the file ~/.ssh/authorized_keys on the Server.
- You may use “cat” command on the client side to view the file and use an editor like “nano” on the server side to modify or create the authorized_keys file.
- After all, it’s recommended to disable the Password authentication as well.
nano /etc/ssh/sshd_configUncomment these lines and change them refer to the line below:
PasswordAuthentication no
PubkeyAuthentication yes
systemctl restart sshd.serviceDisable SSH Protocol 1
SSH has two versions that may use, SSH v1 is older and less secure than protocol SSHv2 2, it’s recommended to be disabled unless you specifically need it.
nano /etc/ssh/sshd_configUncomment the line
Protocol 2,1and change it to:
Protocol 2

Now we restart the SSH service so our new configuration take place.
systemctl restart sshd.service
I get this when trying to enable a random port
SELinux: Could not downgrade policy file /etc/selinux/targeted/policy/policy.30, searching for an older version.
SELinux: Could not open policy file <= /etc/selinux/targeted/policy/policy.30: No such file or directory
/sbin/load_policy: Can't load policy: No such file or directory
libsemanage.semanage_reload_policy: load_policy returned error code 2. (No such file or directory).
Hi,
Regarding your problem, it seem that you have SELinux enabled, so you have to add a rule in order to allow the new port with the following command (e.g. port 2222):
# semanage port -a -t ssh_port_t -p tcp 2222
Thanks
how do you disable the ssh key? thank you