If you want to access the internet safely and securely but you are connected to an untrusted network such as a hotel WiFi, a Virtual Private Network (VPN) allows you to use untrusted networks privately.
In this tutorial, we are going to show you how to make your own Linux OpenVPN server by installing the latest version:”openvpn-2.3″
We are assuming that you have root permission, otherwise, you may start commands with “sudo”.
Installing OpenVPN 2.3
First, you have to install the OpenVPN app:
apt-get install openvpn easy-rsaConfiguring easy-rsa
Now that you have installed OpenVPN successfully, you have to create keys and certificates, follow this section step by step:
Step 1- Copy easy-rsa script generation to OpenVPN folder:
cp -R /usr/share/easy-rsa/ /etc/openvpn/Then go to the easy-rsa directory and edit the “vars” file:
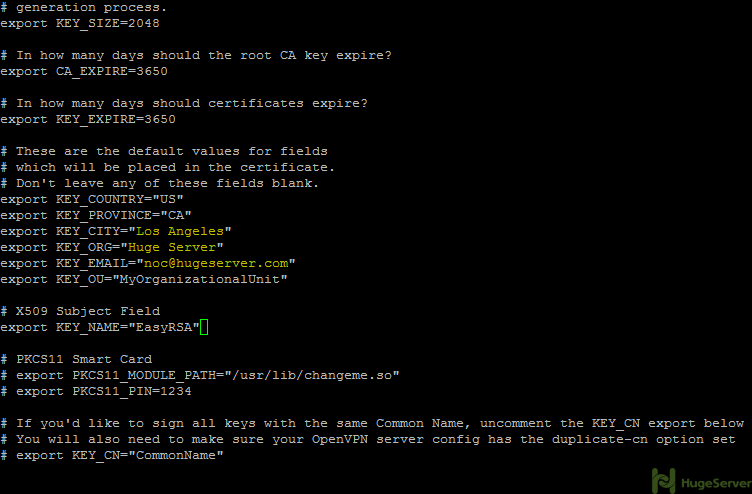
cd /etc/openvpn/easy-rsa/nano vars
you may edit the values to your information here is the example:
Now it’s time to generate the new keys and certificates:
source ./varsRun the above command and you will get the following message:
NOTE: If you run ./clean-all, I will be doing a rm -rf on /etc/openvpn/easy-rsa/keys
It’s recommended to run “./clean-all” right away to ensure that we have a clean certificate setup:
./clean-allNow you have to generate a “Certificate Authority (ca)” file. you will be asked for country name etc. that you edited in the “vars” file. you can hit “Enter” to accept your default values.
Now move to the following directory:
cd /etc/openvpn/easy-rsa/And run the command below to create the “ca” files:
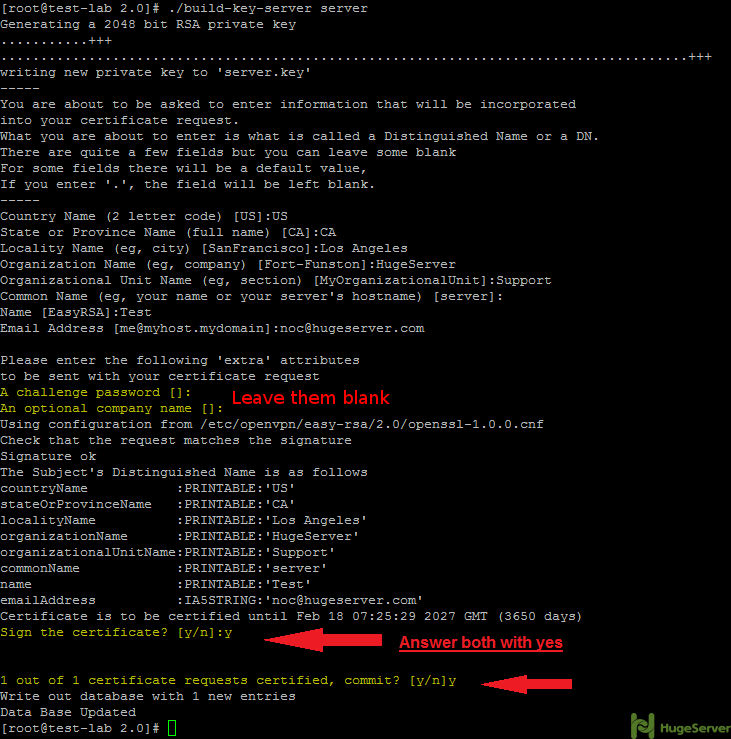
./build-caStep 2- Generating a server key and certificate.
Run the command below in the current directory:
./build-key-server serverYou will be asked for information again you can accept your default values again.
you may leave the two following questions blank:
A challenge password []:
An optional company name []:
Answer the two last questions with “Y”.
Sign the certificate? [y/n]:
1 out of 1 certificate requests certified, commit? [y/n]
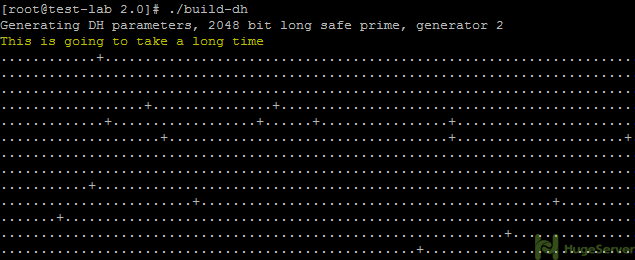
Step 3- Build a Diffie-Hellman key exchange.
Execute the following command in the current directory:
./build-dhPlease wait, it will take some time to generate the files.
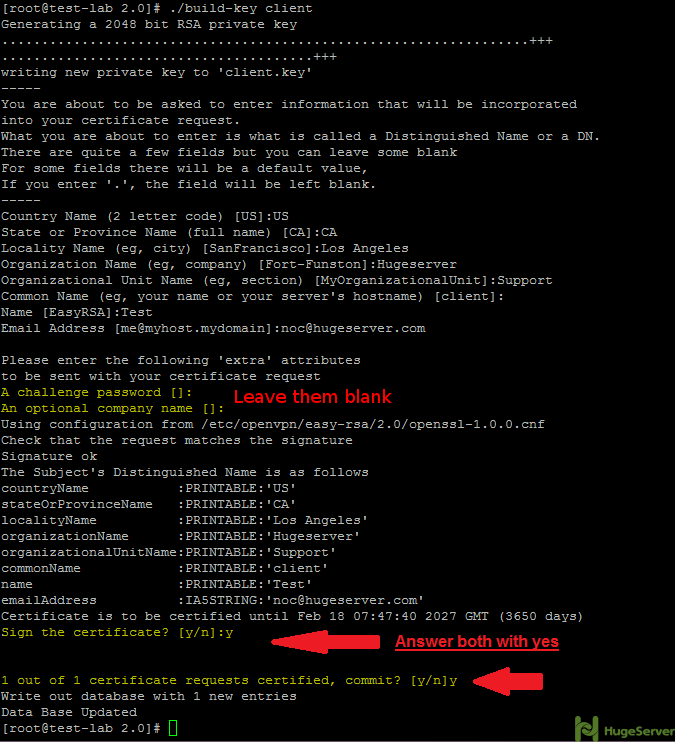
Step 4- Generate client key and certificate.
Run the following command in the current directory to generate client key and certificate:
./build-key clientAnd like step 2 you have to leave two lines blank and answer two questions with “Y”:
Step 5- Move or copy the directory “/keys/” to “/etc/openvpn/”.
cd /etc/openvpn/easy-rsa/cp -R keys/ /etc/openvpn/Configure OpenVPN
Now you have to create an OpenVPN configuration file to make some changes:
cd /etc/openvpn/nano server.confPaste the configurations below (you may change the values of port etc.):
#change with your port
port 1194

#You can use udp or tcp
proto udp

# "dev tun" will create a routed IP tunnel.
dev tun

#Certificate Configuration

#ca certificate
ca /etc/openvpn/keys/ca.crt

#Server Certificate
cert /etc/openvpn/keys/server.crt

#Server Key and keep this is secret
key /etc/openvpn/keys/server.key

#See the size a dh key in /etc/openvpn/keys/
dh /etc/openvpn/keys/dh2048.pem

#Internal IP will get when already connect
server 10.1.1.0 255.255.255.0

#this line will redirect all traffic through our OpenVPN
push "redirect-gateway def1"

#Provide DNS servers to the client, you can use goolge DNS
push "dhcp-option DNS 8.8.8.8"
push "dhcp-option DNS 8.8.4.4"

#Enable multiple client to connect with same key
duplicate-cn

keepalive 20 60
comp-lzo
persist-key
persist-tun
#daemon

log-append /var/log/myvpn/openvpn.log

#Log Level
verb 3
Save and exit (Ctrl+O and Ctrl+X)
Create a folder for the log file and active it:
mkdir -p /var/log/myvpn/touch /var/log/myvpn/openvpn.log
Disable firewalld
For configuring an OpenVPN server you need “iptables” firewall to trigger your preferred Port and give your client(s) access to the internet. you have to disable any other firewall that is already in use.
For disabling firewalld:
systemctl mask firewalldsystemctl stop firewalld
Finding the ethernet interface name
before any firewall configuration you have to find out your ethernet interface name with the command below:
ifconfigThe output should be something like the picture below:

As you see you can find your Ethernet interface name where you see your public IP address. (e.g. “ens3”)
Install and Configure UFW
Step 1- Installing the UFW
Simply excute:
apt-get install ufwStep 2- Enable UFW
ufw allow sshufw enable
Step 3- Enable port forwarding
Simply execute the following command:
sysctl -w net.ipv4.ip_forward=1Step 5- Restart OpenVPN
systemctl restart [email protected]Configuration of UFW
UFW is a user-friendly interface of IPtables, so you if you are using UFW you can stick to it. for setting up OpenVPN configuration in UFW you should follow the instruction below.
First, you should allow your OpenVPN port and the protocol stack you are using for example:
ufw allow 1194/udpThen you have to open UFW configuration file with a text editor to make some changes:
nano /etc/default/ufwLook for DEFAULT_FORWARD_POLICY=”DROP” this must be changed from DROP to ACCEPT
DEFAULT_FORWARD_POLICY="ACCEPT"Next, we will add additional UFW rules for NAT and IP Masquerading of connected clients.
nano /etc/ufw/before.rulesAdd the red area to the file exactly like below: (replace the subnet value and your ethernet interface name)
#
# rules.before
#
# Rules that should be run before the ufw command line added rules. Custom
# rules should be added to one of these chains:
#   ufw-before-input
#   ufw-before-output
#   ufw-before-forward
#

# START OPENVPN RULES
# NAT table rules
*nat
:POSTROUTING ACCEPT [0:0]
# Allow traffic from OpenVPN client to eth0
-A POSTROUTING -s 10.1.1.0/24 -o eth0 -j MASQUERADE
COMMIT
# END OPENVPN RULES

# Don't delete these required lines, otherwise there will be errors
*filter
Creating connection for client
Now we have to create a “.ovpn” connection for the client, we are going to create our connection in ./openvpn/ directory you can create it anywhere you want:
cd /etc/openvpn/nano client.ovpn
Then paste the text below in your file, change IP and port values to yours:
client
dev tun
proto udp

#Server IP and Port
remote 192.168.1.100 1194

resolv-retry infinite
nobind
persist-key
persist-tun
mute-replay-warnings
ca ca.crt
cert client.crt
key client.key
ns-cert-type server
comp-lzo
Now you have to add your “ca.crt” “client.crt” “client.key” contents in your connection.
Remove following red lines:
client
dev tun
proto udp

#Server IP and Port
remote 192.168.1.104 1194

resolv-retry infinite
nobind
persist-key
persist-tun
mute-replay-warnings
ca ca.crt
cert client.crt
key client.key
ns-cert-type server
comp-lzo
Replace those three lines with something like below:
<ca>
(insert ca.crt here)
</ca>
<cert>
(insert client.crt here)
<cert>
<key>
(insert client.key here)
</key>
Now you have to copy the content of files and replace them with red lines:
ca.crt

# cat /etc/openvpn/easy-rsa/2.0/keys/ca.crt

Client.crt

# cat /etc/openvpn/easy-rsa/2.0/keys/client.crt

Client.key

# cat /etc/openvpn/easy-rsa/2.0/keys/client.key
At the end you should have something like this:
<ca>
-----BEGIN CERTIFICATE-----
. . .
-----END CERTIFICATE-----
</ca>

<cert>
Certificate:
. . .
-----END CERTIFICATE-----
. . .
-----END CERTIFICATE-----
</cert>

<key>
-----BEGIN PRIVATE KEY-----
. . .
-----END PRIVATE KEY-----
</key>
Save and exit.
You may find following tutorials useful if you want to connect to a VPN server from Windows or Linux. OpenVPN is available on most operating systems including smartphones (e.g. Android) and MacOS. All you need is to install a OpenVPN client and run the VPN connection file on your device.
How to connect to OpenVPN server through windows
How to connect to OpenVPN server through Linux
You can find more information about OpenVPN on its official website!
I hope you are well. I set up openvpn on VPS for 5 clients (but I only use 3). I noticed that openvpn automatically reboots every day at 4am. So far so good; The problem is that of the 3 client devices, only two reconnect to openvpn and the other (Raspberry Pi4) does not reconnect to openvpn until I reboot raspberry pi itself.
I want help from you to make my openvpn server not automatically restart every day except when I do it manually.
Note: The settings for raspberry pi are well done because when I reboot raspberry it reconnects to openvpn automatically, but when openvpn server reboots, raspberry pi doesn’t reconnect to openvpn .
The information is somewhat incomplete here. At a moment you table about systemctl restart openvpn
But there isn’t anything to restart when the steps to make this a service isn’t done.