Introduction
As it’s clear, both Nginx and Apache are powerful web servers. Apache’s power and Nginx’s speed are well known, However, both of them do have drawbacks. Apache is hard on server’s memory while Nginx can’t process PHP on its own and needs the help of the PHP-FPM or similar modules for dynamic content.
In this tutorial, we are going to combine the two web servers to get the best result of each other, We are going to set Nginx as our static content processor and Apache to processing the back end and dynamic content.
We are assuming that you have root permission, otherwise, you may start commands with “sudo”.
Install and Configure Nginx
Run an update on your repositories list first:
apt-get updateNow install Nginx easily with:
apt-get install nginx -yEnable and start Nginx service:
systemctl enable nginxsystemctl start nginx
Configure Nginx
Create a text file in your “sites-available” path with the command below:
nano /etc/nginx/sites-available/default2Paste the following configuration in your file then save and exit:
server {
        listen   80;

        root /usr/share/nginx/html/;
        index index.php index.html index.htm;

        server_name _;

        location / {
        try_files $uri $uri/ /index.php;
        }

        location ~ \.php$ {

        proxy_set_header X-Real-IP  $remote_addr;
        proxy_set_header X-Forwarded-For $remote_addr;
        proxy_set_header Host $host;
        proxy_pass http://127.0.0.1:8080;

         }

         location ~ /\.ht {
                deny all;
        }
}
Now you have to make a symlink from your “sites-available” configuration to your “sites-enabled” directory:
ln -s /etc/nginx/sites-available/default2 /etc/nginx/sites-enabled/default2Install and Configure Apache
If you have Apache already installed you can skip this section.
install Apache web server with the command below:
apt-get install apache2Start and enable the apache2 service:
systemctl enable apache2systemctl start apache2
Configure Apache
We need to configure the Apache to take the backend part of the job, for that cause we need to configure the Apache to listen on port 8080:
nano /etc/apache2/ports.confFind the line that starts with “listen” remove it and paste the following lines instead:
NameVirtualHost 127.0.0.1:8080
Listen 127.0.0.1:8080
Save and Exit.
Open the following config file with your text editor:
nano /etc/apache2/sites-available/000-default.confFind the “<VirtualHost>” directive and change the value to below:
<VirtualHost 127.0.0.1:8080>Then find the line that starts with “DocumentRoot” and change the path to Nginx default path:
DocumentRoot /usr/share/nginx/html/Install PHP5
You can install PHP5 easily with the command below:
apt-get install php5Test your PHP processor
In this section we are going to test if our PHP is functioning properly and more importantly if it’s processed by the Apache Handler:
create a PHP file in your document root using the following command:
nano /usr/share/nginx/html/info.phpPaste the following code in it then save and exit:
<?php phpinfo(); ?>Now you can open your browser and enter the following address to see the following page (make sure to replace the red part with your own Domain name or public IP address):
http://DOMAIN_OR_IP_ADDRESS/info.php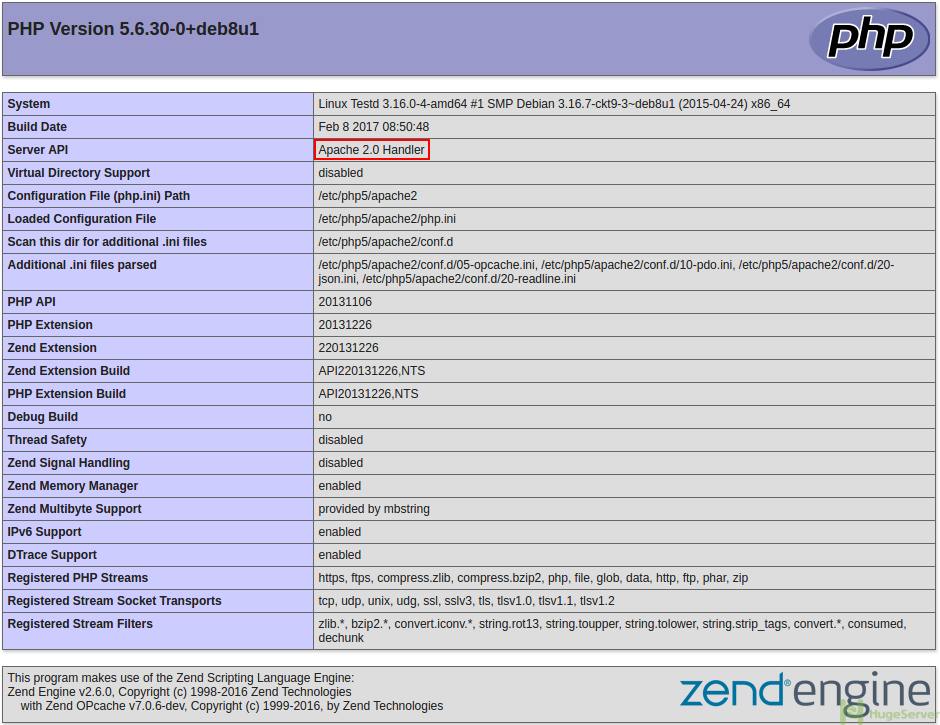
Still loading the default page not sure where i went wrong ?
Hi,
Enter your Domain name or IP address followed by “/info.php”
e.g. ‘http://yoursite.com/info.php’
Thanks