If you want to access the internet safely and securely but you are connected to an untrusted network such as a hotel WiFi, a Virtual Private Network (VPN) allows you to use untrusted networks privately.
In this tutorial, we are going to show you how to make your own Linux OpenVPN server by installing the latest version:”openvpn-2.3″
We are assuming that you have root permission, otherwise, you may start commands with “sudo”.
Installing OpenVPN 2.3
First, you have to install the OpenVPN app:
For CentOS you should add Epel repository:
yum install epel-releaseyum updateyum install openvpn easy-rsa
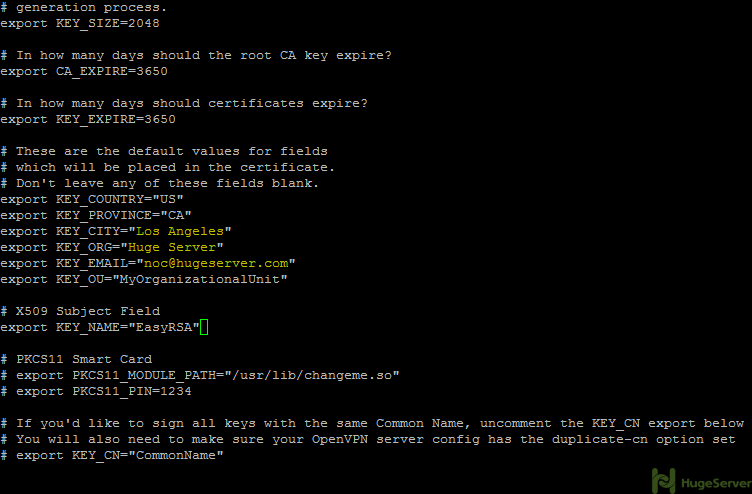
Configuring easy-rsa
Now that you have installed OpenVPN successfully, you have to create keys and certificates, follow this section step by step:
Step 1- Copy easy-rsa script generation to OpenVPN folder:
cp -R /usr/share/easy-rsa/ /etc/openvpn/Then go to the easy-rsa directory and edit the “vars” file:
cd /etc/openvpn/easy-rsa/2.0/nano vars
you may edit the values to your information here is the example:
Now it’s time to generate the new keys and certificates:
source ./varsRun the above command and you will get the following message:
NOTE: If you run ./clean-all, I will be doing a rm -rf on /etc/openvpn/easy-rsa/2.0/keys
It’s recommended to run “./clean-all” right away to ensure that we have a clean certificate setup:
./clean-allNow you have to generate a “Certificate Authority (ca)” file. you will be asked for country name etc. that you edited in the “vars” file. you can hit “Enter” to accept your default values.
Now move to the following directory:
cd /etc/openvpn/easy-rsa/2.0/And run the command below to create the “ca” files:
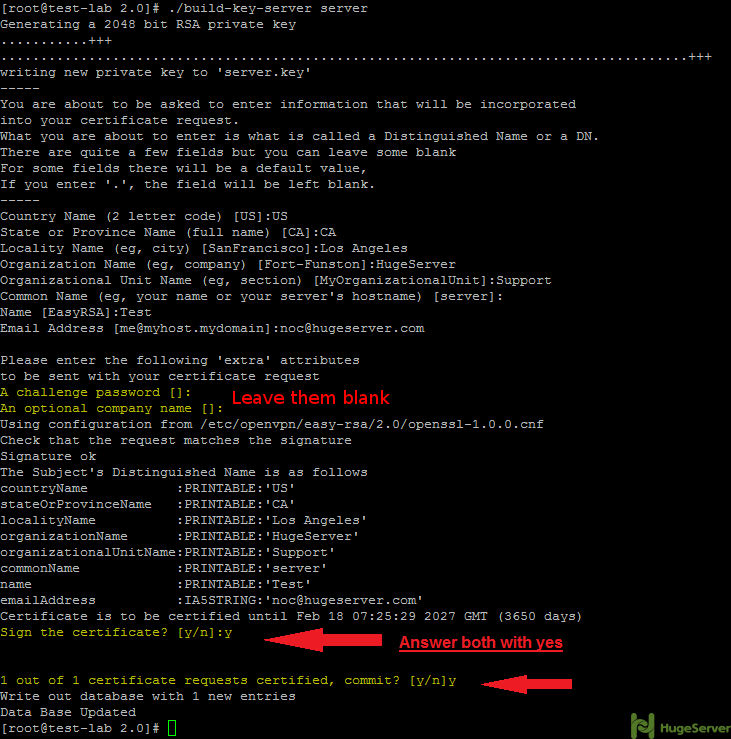
./build-caStep 2- Generating a server key and certificate.
Run the command below in the current directory:
./build-key-server serverYou will be asked for information again you can accept your default values again.
You may leave the two following questions blank:
A challenge password []:
An optional company name []:
Answer the two last questions with “Y”.
Sign the certificate? [y/n]:
1 out of 1 certificate requests certified, commit? [y/n]
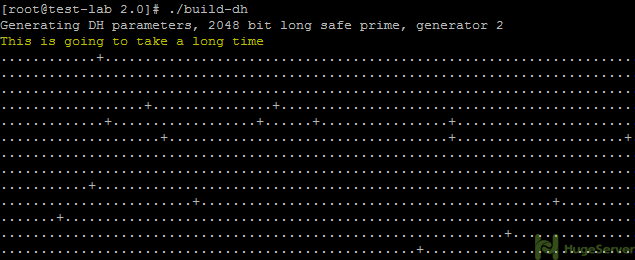
Step 3- Build a Diffie-Hellman key exchange.
Execute the following command in the current directory:
./build-dhPlease wait, it will take some time to generate the files.
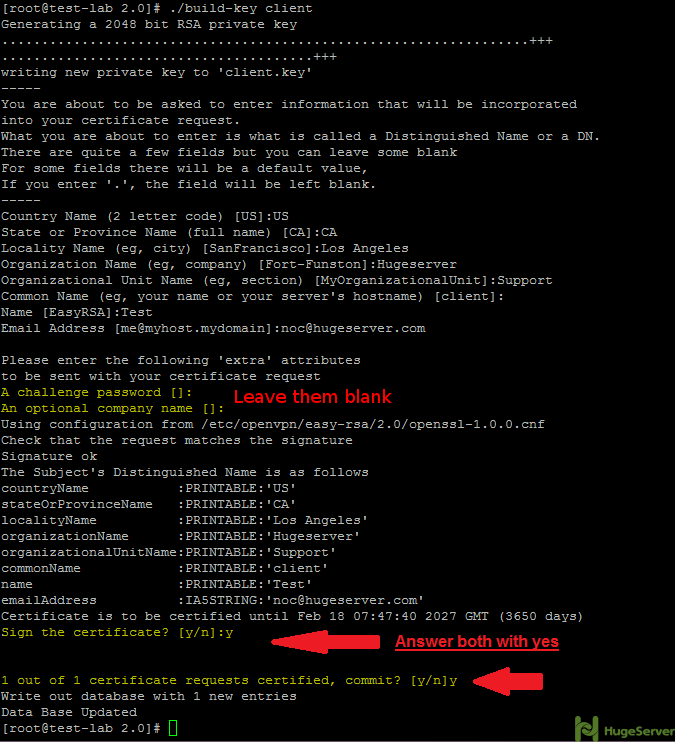
Step 4- Generate client key and certificate.
Run the following command in the current directory to generate client key and certificate:
./build-key clientAnd like step 2 you have to leave two lines blank and answer two questions with “Y”:
Step 5- Move or copy the directory “/keys/” to “/etc/openvpn/”.
cd /etc/openvpn/easy-rsa/2.0/cp -R keys/ /etc/openvpn/Configure OpenVPN
Now you have to create an OpenVPN configuration file to make some changes:
cd /etc/openvpn/
nano server.conf
Paste the configurations below (you may change the values of port etc.):
#change with your port
port 1194

#You can use udp or tcp
proto udp

# "dev tun" will create a routed IP tunnel.
dev tun

#Certificate Configuration

#ca certificate
ca /etc/openvpn/keys/ca.crt

#Server Certificate
cert /etc/openvpn/keys/server.crt

#Server Key and keep this is secret
key /etc/openvpn/keys/server.key

#See the size a dh key in /etc/openvpn/keys/
dh /etc/openvpn/keys/dh2048.pem

#Internal IP will get when already connect
server 10.1.1.0 255.255.255.0

#this line will redirect all traffic through our OpenVPN
push "redirect-gateway def1"

#Provide DNS servers to the client, you can use goolge DNS
push "dhcp-option DNS 8.8.8.8"
push "dhcp-option DNS 8.8.4.4"

#Enable multiple client to connect with same key
duplicate-cn

keepalive 20 60
comp-lzo
persist-key
persist-tun
#daemon

log-append /var/log/myvpn/openvpn.log

#Log Level
verb 3
Save and exit (Ctrl+O and Ctrl+X)
Create a folder for the log file and active it:
mkdir -p /var/log/myvpn/touch /var/log/myvpn/openvpn.log
Disable SELinux
For configuring an OpenVPN server you need “iptables” firewall to trigger your preferred Port and give your client(s) access to the internet. you have to disable any other firewall that is already in use.
For disabling SELinux:
nano /etc/sysconfig/selinuxAnd change SELINUX line like below:
SELINUX=disabledThen reboot the server to apply the changes.
Finding the ethernet interface name
before any firewall configuration you have to find out your ethernet interface name with the command below:
ifconfigThe output should be something like the picture below:

As you see you can find your Ethernet interface name where you see your public IP address. (e.g. “ens3”)
Install and Configure Iptables
Step 0- Disable Firewalld
You can disable Firewalld easily by executing:
systemctl mask firewalldsystemctl stop firewalld
Step 1- Installing the Iptables
For installing Iptables and it’s service, execute:
yum install iptables iptables-servicesStep 2- Enable Iptables
systemctl enable iptablessystemctl start iptablesiptables -F
Step 3- Add rules to Iptables
iptables -t nat -A POSTROUTING -s 10.1.1.0/24 -o ens3 -j MASQUERADEBe sure that you replace the value of “10.1.1.0/24” and ethernet interface name with your preferred values.
Also add the following rule to allow SSH on your server:
iptables -A INPUT -p tcp --dport ssh -j ACCEPTiptables-save > /etc/sysconfig/iptablesvpnStep 4- Enable port forwarding
Simply execute the following two commands:
sysctl -w net.ipv4.ip_forward=1Step 5- Restart OpenVPN
systemctl restart [email protected]Creating connection for client
Now we have to create a “.ovpn” connection for the client, we are going to create our connection in ./openvpn/ directory you can create it anywhere you want:
cd /etc/openvpn/nano client.ovpn
Then paste the text below in your file, change IP and port values to yours:
client
dev tun
proto udp

#Server IP and Port
remote 192.168.1.100 1194

resolv-retry infinite
nobind
persist-key
persist-tun
mute-replay-warnings
ca ca.crt
cert client.crt
key client.key
ns-cert-type server
comp-lzo
Now you have to add your “ca.crt” “client.crt” “client.key” contents in your connection.
Remove following red lines:
client
dev tun
proto udp

#Server IP and Port
remote 192.168.1.104 1194

resolv-retry infinite
nobind
persist-key
persist-tun
mute-replay-warnings
ca ca.crt
cert client.crt
key client.key
ns-cert-type server
comp-lzo
Replace those three lines with something like below:
<ca>
(insert ca.crt here)
</ca>
<cert>
(insert client.crt here)
<cert>
<key>
(insert client.key here)
</key>
Now you have to copy the content of files and replace them with red lines:
ca.crt

# cat /etc/openvpn/easy-rsa/2.0/keys/ca.crt

Client.crt

# cat /etc/openvpn/easy-rsa/2.0/keys/client.crt

Client.key

# cat /etc/openvpn/easy-rsa/2.0/keys/client.key
At the end you should have something like this:
<ca>
-----BEGIN CERTIFICATE-----
. . .
-----END CERTIFICATE-----
</ca>

<cert>
Certificate:
. . .
-----END CERTIFICATE-----
. . .
-----END CERTIFICATE-----
</cert>

<key>
-----BEGIN PRIVATE KEY-----
. . .
-----END PRIVATE KEY-----
</key>
Save and exit.
You may find following tutorials useful if you want to connect to a VPN server from Windows or Linux. OpenVPN is available on most operating systems including smartphones (e.g. Android) and MacOS. All you need is to install an OpenVPN client and run the VPN connection file on your device.
How to connect to OpenVPN server through windows
How to connect to OpenVPN server through Linux
You can find out more information about OpenVPN in its official website.
I followed your steps and it worked.
The last part about the “ca.crt” “client.crt” “client.key”, I just downloaded the 3 files and put them in the same folder of the .ovpn file.
Don’t need to copy the content of the files into the .ovpn file. That make things easier
Hello Kai,
We’re glad that it worked. Your suggestion on this tutorial is highly appreciated and we will consider for here and further posts.
Thank you for reading.
Thanks for this how to.
There is no need (and I do not recommend) to disable selinux.
Just do
#chcon -t var_log_t /var/log/myvpn/openvpn.log
and all will run fine with selinux enabled.
Hi,
Thanks for the suggestion, we will consider it for modifying the article.
In case you create more client certificates I created a little script to easily to create client.ovpn files:
[Snipped]
and it will create the client.ovpn file.
Hi Rene,
Thanks for sharing with us.
Hi,
I have recently deployed Centos 6.5 + OpenVPN using Webmin. A peculiar issue facing on OpenVPN Server, where exactly after 24 minutes the Service gets stopped automatically and Deleting Interface tun0 10.X.X.X and connection gets dropped. Any one can help on this resolve the issue?
Nov 15 03:49:16 pbxus ntpd[32009]: Listen normally on 6 tun0 10.8.0.1 UDP 123
Nov 15 03:49:16 pbxus ntpd[32009]: peers refreshed
Nov 15 03:49:47 pbxus php: /sbin/ip6tables -A fpbxinterfaces -i tun0 -j zone-internal
Nov 15 03:53:27 pbxus kernel: ACPI: No handler for Region [POWR] (ffff88026cd947c8) [IPMI]
Nov 15 04:00:15 pbx php: /sbin/iptables -D fpbxinterfaces 6
[Snipped]
Thanks
Ram
Hello Ramkumar,
Regarding your problem,
Find the “keepalive” line in your server configuration and comment it out with “#”.
And also add “reneg-sec 0” in that file. then, restart OpenVPN service and it should be solved.
Thanks
Excellent guide. Thanks. I’ve only one problem – I can’t use ssh after this. “Connection refused” Any idea?
Hi,
You can add a rule to your iptables to allow SSH with the following command:
# iptables -A INPUT -p tcp –dport ssh -j ACCEPT
And execute the command below to make it permanent:
# iptables-save > /etc/iptables.conf
Thanks
I’ve done it in “Install and Configure Iptables” Step 3. After few tries, I change SSH port to default 22. Now it’s working. Is any chance to change to custom port with SELINUX disabled?
Hello,
We’re glad that it worked,
Yes, it’s possible you can do it by following our tutorial on Securing SSH.
https://www.hugeserver.com/kb/secure-ssh-on-centos-7/
Thanks
Hi, I tried to install but could not make it. I am using centos 6.4 64 bit. After installing easy-rsa I am not able to found /usr/share/easy-rsa/2.0 it is showing 3.0 and also all required files are not there. can any body help me to find the same.
Hi,
This article is about Installing OpenVPN on CentOS 7, making it work on CentOS 6 could be quite different
Thanks
i have same issue, confirmed i am on centos 7 also
Well, it seems, that there was an upgrade from easyrsa 2.0 to 3.0 on CentOS 7 just some weeks ago, so this guide will not work without modifications anymore!
Search for “Easy-RSA v3 OpenVPN Howto” to find a solution for that…
Hi ,
Thanks for explanation , it was able to setup openvpn , but i was not able to telnet on 1194 with udp proto setting once i shifted it to tcp i was able to telnet and my openvpn also got connected. I am doing this setup on AWS public subnet to access my private subnet. when i do ssh my private subnet after connecting to vpn it says connection refused.
i have 1 problem vpn conekt diconekt only 5 second