Introduction
HHVM is an open-source virtual machine designed for executing programs written in Hack and PHP. HHVM uses a just-in-time (JIT) compilation approach to achieve higher performance while maintaining the development flexibility that PHP provides.
HHVM supports Hack, PHP 5 and the major features of PHP 7.
Attention: please note that HHVM only works on 64-bit machines.
We are assuming that you have root permission, otherwise, you may start commands with “sudo”.
![]()
Install HHVM on Debian 8
For installing HHVM on Debian 8 you have to add a repository first:
apt-key adv --recv-keys --keyserver hkp://keyserver.ubuntu.com:80 0x5a16e7281be7a449echo deb http://dl.hhvm.com/debian $(lsb_release -sc) main | tee /etc/apt/sources.list.d/hhvm.list
Now you just have to update your repositories list and then easily install HHVM via apt:
apt-get updateapt-get install hhvm
Make your HHVM to run at startup:
update-rc.d hhvm defaultsHHVM includes a perfect script to install FastCGI based on the web server you have installed. Run it with the following command:
/usr/share/hhvm/install_fastcgi.shJust if you are using Apache
On Apache, there have been issues with hhvm_proxy_fcgi.conf not matching the default directory and when you access PHP sites you get a 404 File Not Found. To fix this, use your favorite text editor and open the following file:
nano /etc/apache2/mods-enabled/hhvm_proxy_fcgi.confReplace the following line with the existing line in the file:
ProxyPassMatch ^/(.+\.(hh|php)(/.*)?)$ fcgi://127.0.0.1:9000/var/www/html/$1Restart your Web server and HHVM:
systemctl restart apache2systemctl restart hhvm
Test your HHVM
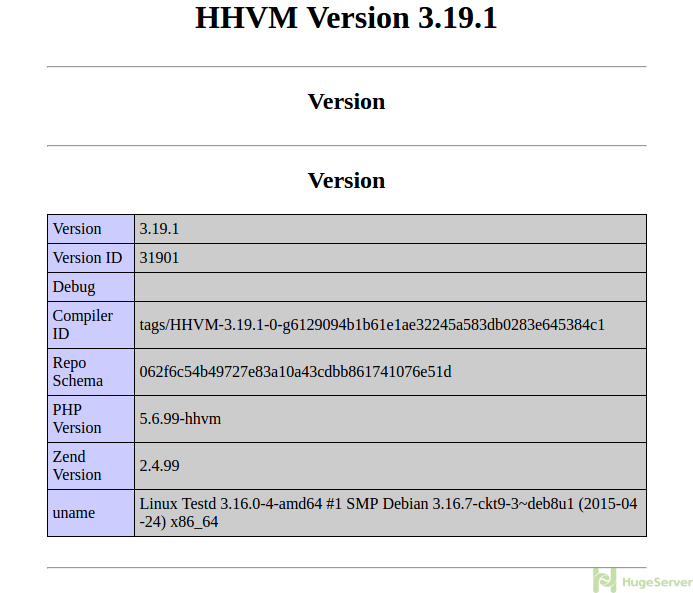
For testing your HHVM you can follow the instructions below:
If you are using Apache move to the following directory:
cd /var/www/html/If you are using Nginx as web server enter the following directory:
cd /usr/share/nginx/html/Then create a file named “info.php” with your text editor:
nano info.phpPaste the following line in the file then save and exit:
<?php phpinfo(); ?>open your browser and enter your Domain name or your IP address with the “/info.php” included, if you’ve done everything right you have to see a page like below:
Install HHVM on Ubuntu 16
For installing HHVM on Ubuntu 16 you have to add a repository first:
apt-get updateapt-get install software-properties-commonapt-key adv --recv-keys --keyserver hkp://keyserver.ubuntu.com:80 0x5a16e7281be7a449add-apt-repository "deb http://dl.hhvm.com/ubuntu $(lsb_release -sc) main"
Now just update your repositories list and install HHVM via apt:
apt-get updateapt-get install hhvm
Make your HHVM to run at startup:
update-rc.d hhvm defaultsHHVM includes a perfect script to install FastCGI based on the web server you have installed. Run it with the following command:
/usr/share/hhvm/install_fastcgi.shJust if you are using Apache
On Apache, there have been issues with hhvm_proxy_fcgi.conf not matching the default directory and when you access PHP sites you get a 404 File Not Found. To fix this, use your favorite text editor open the following file:
nano /etc/apache2/mods-enabled/hhvm_proxy_fcgi.confReplace the following line with the existing line in the file:
ProxyPassMatch ^/(.+\.(hh|php)(/.*)?)$ fcgi://127.0.0.1:9000/var/www/html/$1Restart your Web server and HHVM:
systemctl restart apache2systemctl restart hhvm
Test your HHVM
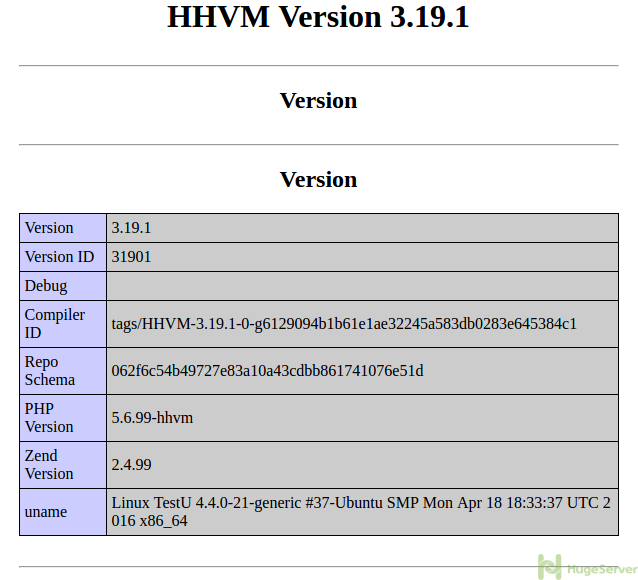
For testing your HHVM you can follow the instructions below:
If you are using Apache move to the following directory:
cd /var/www/html/info.phpIf you are using Nginx as web server enter the following directory:
cd /usr/share/nginx/html/Then create a file named “info.php” with your text editor:
nano info.phpPaste the following line in the file then save and exit:
<?php phpinfo(); ?>open your browser and enter your Domain name or your IP address with the “/info.php” included, if you’ve done everything right you have to see a page like below:
You can find out more about HHVM and Hack programming in HHVM offcial website!