Introduction
As it’s clear, both Nginx and Apache are powerful web servers. Apache’s power and Nginx’s speed are well known, However, both of them do have drawbacks. Apache is hard on server’s memory while Nginx can’t process PHP on its own and needs the help of the PHP-FPM or similar modules for dynamic content.
In this tutorial, we are going to combine the two web servers to get the best result of each other, We are going to set Nginx as our static content processor and Apache to processing the back end and dynamic content.
We are assuming that you have root permission, otherwise, you may start commands with “sudo”.
Install and Configure Nginx
Run an update on your repositories list first:
yum update -yNow install Epel repository easily with:
yum install epel-release -yThen install nginx using the command below:
yum install nginx -yEnable and start Nginx service:
systemctl enable nginxsystemctl start nginx
Configure Nginx
Create a config file with the following command:
nano /etc/nginx/conf.d/default.confPaste the following configuration in your file then save and exit:
server {
        listen   80;

        root /usr/share/nginx/html/;
        index index.php index.html index.htm;

        server_name _;

        location / {
        try_files $uri $uri/ /index.php;
        }

        location ~ \.php$ {

        proxy_set_header X-Real-IP  $remote_addr;
        proxy_set_header X-Forwarded-For $remote_addr;
        proxy_set_header Host $host;
        proxy_pass http://127.0.0.1:8080;

         }

         location ~ /\.ht {
                deny all;
        }
}
Install and Configure Apache
If you have Apache already installed you can skip this section.
install Apache web server with the command below:
yum install httpd
Start and enable the httpd service:
systemctl enable httpdsystemctl start httpd
Configure Apache
We need to configure the Apache to take the backend part of the job, for that cause we need to configure the Apache to listen on port 8080:
nano /etc/httpd/conf/httpd.confFind the line that starts with “listen” remove it and paste the following lines instead:
Listen 127.0.0.1:8080Then find the line that starts with “DocumentRoot” and modify it like below:
DocumentRoot "/usr/share/nginx/html/" The “DocumentRoot” should be the same on both Nginx and Apache, If you have VirtualHost(s) configured, it should be configured on both of them.
Save and Exit.
Install PHP5
You can install PHP5 easily with the command below:
yum install phpTesting your PHP
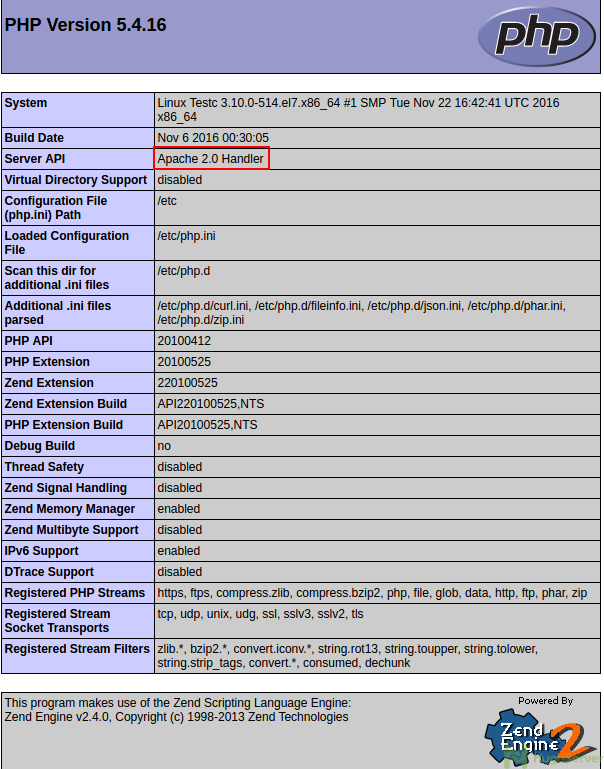
In this section we are going to test if our PHP is functioning properly and more importantly if it’s processed by the Apache Handler:
create a PHP file in your document root using the following command:
nano /usr/share/nginx/html/info.phpPaste the following code in it then save and exit:
<?php phpinfo(); ?>Now you can open your browser and enter your Domain or your Public IP address, you should see the following page:
hi i cannot access with my public ip.and cannot see the php page too
Hi Mehdi,
First of all, check if your Web servers are up:
systemctl status httpd
systemctl status nginx
If everything was OK then execute the following command to check if your Port 80 is listening:
netstat -ln | grep 80
For making sure that you don’t have any Firewall or network connectivity problem see the result of the following command:
curl localhost
curl localhost returns the site, but I can’t access it from the browser… help?
Please check if you are on the network that is sharing the website. You may have ran this on a very nested environment
Please check your firewall on server. You need to allow port 80
This part is confusing, could you elaborate?
Configure Nginx
Create a text file in your “sites-available” path with the command below:
nano /etc/nginx/conf.d/default.conf
Hi,
That part refers to creating a config (web-server main configuration) file in the proper directory.
Thanks for the heads up.
hi
Why are the PHP files downloaded instead of processed?
centos 7.3
Hi Emad,
Regarding your problem, execute the following command to check if your PHP module is loaded on Apache:
# apachectl -M | grep php
you should get the following output:
php5_module (shared)
Thanks
i have error 403 Forbidden
Thanks for the tutorial. I think I’m close to getting this configuration working.
However, on last step, when I open browser to my Domain, I see the default nginx static web page, index.html instead of the php info from the info.php file. I tried directing browser to the info.php file directory, but file is downloaded not executed. The PHP module is loaded on Apache (returns php5_module (shared)). Any ideas? Thanks!
Hi Amir,
I followed all the steps. However, I can not access the info.php file. This is the error message I am getting:
Forbidden
You don’t have permission to access /info.php on this server.
Would you maybe assist me on how to solve. Both nginx and httpd services are running with no issues.
This is the error message in apache errror log:
[Sat Apr 20 06:29:25.383642 2019] [authz_core:error] [pid 13253] [client 127.0.0.1:48478] AH01630: client denied by server configuration: /usr/share/nginx/html/info.php
I seem to have solved the issue, however, I am not sure what security implications on changes I have done.
This is what I changed:
#
# Relax access to content within /var/www. SO. I change from .
# /var/www to in Directory line
and changes on this line here.
# Further relax access to the default document root: