HugeServer Blog

Updates and News about HugeServer !

CentOS 6 crashed after restarting network

One of our dedicated servers, which is CentOS 6 based crashed today after I wanted to restart the network interface. Simply after running the following command

service network restart

The box has crashed and I had to reboot it. After server comes up, I have checked the logs to see what was wrong on the server. I have found it.

There is a new and current bug which might be solved on CentOS 7, but not yet on CentOS 6. The bug is in “ifdown-eth” script on CentOS which looks like following :

if [ -d "/sys/class/net/${REALDEVICE}" ]; then
 if [ "${REALDEVICE}" = "${DEVICE}" ]; then
 ip addr flush dev ${REALDEVICE} scope global 2>/dev/null
 else
  ip addr flush dev ${REALDEVICE} label ${DEVICE} scope global 2>/dev/null
 fi
[...]

The issue is in the loop-back interface, so we have to change the script to something like following:

if [ -d "/sys/class/net/${REALDEVICE}" ]; then
 if [ "${REALDEVICE}" = "lo" ]; then
  SCOPE="host"
 else
  SCOPE="global"
 fi

 if [ "${REALDEVICE}" = "${DEVICE}" ]; then
  ip addr flush dev ${REALDEVICE} scope ${SCOPE} 2>/dev/null
 else
  ip addr flush dev ${REALDEVICE} label ${DEVICE} scope ${SCOPE} 2>/dev/null
 fi
[...]

After changing the script and restarting the interface, the server was working fine again.

I hope this can help you all, who faces the same issue.

How to speed up yum on centos

Yum is a great tool to install, remove and update packages on centos. As all of you may know yum uses the fastest mirror to download and install the packages on your dedicated server or your desktop computer.

Sometimes it comes to a slow connection between you and the current fastest mirror which is cached on yum, and you are getting a very low download speed for the packages.

To speed up yum, you may reset the yum’s fastest mirror on your dedicated server, and let it choose a new fast mirror to download the packages.

To perform this speed up on your yum, you should run the following command into your ssh/console. This command will remove the cache file of your current fastest mirror, and once you run the yum again, it will choose a new mirror for itself.

rm-f /var/cache/yum/timedhosts.txt

You can now install your packages faster …

yum -y update all
yum -y install PACKAGE_NAME

Thanks!

WinMTR & MTR helping you to trace your network

Are you sometimes having trouble to load your website or access your dedicated server, or are you getting lags using your server SSH or Remote Desktop?

Are you looking for a solution to see packet loss and latency between two networks?

MTR / WinMTR will help you to make your life easier. You can install MTR on any dedicated server or any desktop pcs to track your outgoing network easier.

To install the MTR on Linux based systems, you can use yum or apt-get to get it installed. To install MTR on your windows system, you can download WinMTR from here, and install it on your windows system.

CentOS  :  yum install mtr -y
Ubuntu, Debian : apt-get install mtr -y

The usage of mtr is very easy and simple, you only have to run the following command to see the results.

mtr hugeserver.com

Instead of “hugeserver.com” you can put any other IP addresses or domain names to see the hops and the route your source server to your destination server.

If you want to see only the ip addresses and not the domain information ( rdns ) of them, you can click “n” during the program is running or simply use the following command

mtr -n hugeserver.com

You may change the packet size to something else with adding the package size after hostname or ip address.

mtr -n hugeserver.com 100

This tool can help you to determinate any packet loss between two network.

Thanks

How to use IPMITool on Linux

You are managing a dedicated server from Internet, and want to access to IPMI? You have colocated a dedicated server in a datacenter and you are looking to have a way to cut off the expensive remote hand fees for reboots, KVM installation, and correction? This can be easily done over IPMI.

But sometimes it is common to happen that your IPMI is not accessible over an Internet interface. This issue may have several reasons. Maybe your IP Configuration is not correct, or maybe the IPMI has crashed, etc.

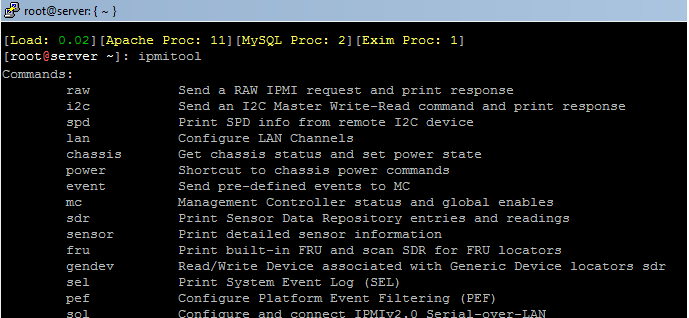
Here is an easy way to correct such problems on your own dedicated server. At the first we have to install ipmitool on our dedicated box. For installing the ipmitool program you have two way to choose, one is using “yum” on CentOS or “apt-get” on Ubuntu, Debian, and the second way is installing this program from source. I will show you all 3 ways to install IPMITool on our dedicated box.

Installing on CentOS via yum

[root@server ~]: yum install ipmitool -y
[root@server ~]: modprobe ipmi_devintf

Now you can use ipmitool and see/edit the details of your ipmi setting on your dedicated server without having to boot the server into BIOS.

Do you want to see the chassis information of your server, then you have to use following command.

ipmitool chassis status

You can also see the power information of your server, by using the following command.  Instead of status at the end of the command  you can use “cycle” to power cycle the chassis, “on” to power on the chassis, “off” to power off your server and …

ipmitool chassis power status

You can also see and edit the network configuration of your chassis via ipmitoo. For reviewing the Network Configuration you should use following command, as output you will see a list of information, the important details for you might be the “IP Address” section, which shows your current public or private ip address of ipmi.

ipmitool lan print

If you have troubles with your current IP addresses and want to change the IP address to another one, you can perform following command

 ipmitool lan set 1 ipaddr  IPADDRESS
ipmitool lan set 1 netmask  NETMASK
ipmitool lan set 1 defgw ipaddr  GATEWAY

Sometimes you will see that your ipmi console is not working, or your web interface is not loading for you. The best and simplest way you can solve such issues, is resetting the bmc of IPMI. For performing this you should run the following command. This command won’t reboot your dedicated server, and will only reset the bmc of ipmi.

ipmitool chassis power reset cold

You want to see how hot your server currently is? No problem it is simple with IPMITool. You can use following command to see the temperature of your server/cpu and chassis.

ipmitool sensor | grep “Temp”

There are a lot more to use with this helpful command, if you have any question regarding this software, please leave a Comment for me and I will get back to you with a solution.

I hope this article helps you.

Free upgrade to triple bandwidth !

Hello,

We appreciate our loyal customers that stayed with us for such a long time , and decided to add some value to current and new servers that will be ordered until 30th November.

Any Dedicated Server customer can contact our sales department and have his/her servers bandwidth upgraded to triple amount! This will significantly help customers that had bandwidth overage on previous months .

Please note that if you’re about ordering a new server , you may see 10TB on the order form but we will set it to 30TB as soon as you claim it to your account manager.

Beyond that , We’re running some promotions for 100TB bandwidth servers this month 🙂

You sales department can be reached by the email sales@hugeserver.com or calling 888-842-8570.

We appreciate your business and look forward to serving you in the future.

Saman Soltani
Co-Founder
HugeServer Networks ,LLC

Announcing ION Control Panel !

Hello !

We’re glad to announce our brand-new control panel with code name of “ION” =)

Our Development team has been working hard to develop a control panel that let customers manage their servers easily on any device and work with support , manage bills ,etc .

Key features of the control panel for managing servers are : Soft and Hard Reboot , Periodic Bandwidth Statics , Real time Bandwidth Graphs , rDNS Records , Private Network connection , On-Demand KVM Console , IPMI . Server re-installation , Adding Extra IPs and more !

General feature including managing sub-accounts with comprehensive access-list , generating API tokens , manage billing and accounting , make emergency request to support department , see account login history and much more !

You can find some screen shots below the post , take a minute and login to the new control panel and find more 😉

The control panel can be accessed on https://ion.hugeserver.com

We have released ION API 1.0 , The web service and application programming interface that helps our customers to do automation on their end with any programming language . The document can be found at the control panel.

This release is considered as first and the team will continue to develop new features for our customers.


Thank you ,

Saman Soltani

Co-Founder at HugeServer Networks, LLC

Continue reading Announcing ION Control Panel !

How to fix Shellshock bash vulnerability

On Sep 24, 2014, a GNU Bash vulnerability with name of Shellshock or the “Bash Bug”, was disclosed. the vulnerability allows remote attackers to execut code given certain conditions by passing strings of code following environment variable assignments

You can find more details about the vulnerability on CVE-2014-6271 and CVE-2014-7169

Check System Vulnerability

On any system that is running bash you may check the ShellShock vulnerability by running the following command :

env VAR='() { :;}; echo Bash is vulnerable' bash -c "echo Bash Test"
“echo Bash is vulnerable” is where the remote attacker can inject malicious commands , if you see the following command your Bash is vulnerable and you need to update it .

Bash is vulnerable
Bash Test

Otherwise , if you’re not seeing “Bash is vulnerable” as output of command ,your version of bash is not vulnerable .

Continue reading How to fix Shellshock bash vulnerability

New datacenter at Los Angeles !

We’re glad to announce the latest location in Los Angeles , California with code name of LAX3 – as a leading provider of dedicated server, colocation and cloud services we’re always looking to support our customers growing demands and provide better service .

Our new Juniper powered network and adding new private peerings and PCCW let us to reach Asia Pacific more quickly with less hops ! This is great for our customers and we keep trying improve our network for you.

As monitoring flow data I noticed about %25 lower latency to Asia from the new network .

During past months , We have been working so hard to build this infrastructure for your business growth and keep on implementing Automation and features for you.

For more concerns regarding our new facility please send an email to sales@hugeserver.com or call 888-842-8570

Installing Axel on CentOS 6

2017 UpdateThis article is outdated and might not be working please see new version here.

Hello,

Is WGET slow for you ? Did you tried increasing TCP Buffer and still not having the results you expect for downloads ? Do you need resume and multi connection functionality ? The solution is Axel

In Windows we have many download manager softwares that let us download with the maximized speed and resume ability but with Linux there are a few based on CLI as the most are with GUI.

Axel Installation :

Here we are going to install Axel and then explain how to use it.

– Debian Based Distro : If you’re on a Debian Based distributions like Ubuntu you can install Axel easily with apt-get .

apt-get install axel

– Redhat Based Distro : Axel is not included in Yum repository by default if you don’t have EPEL / Remo so you need to install it from scratch via source code or use RPMs which is faster and more easy.

rpm -ivh ftp://fr2.rpmfind.net/linux/dag/redhat/el6/en/x86_64/dag/RPMS/axel-2.4-1.el6.rf.x86_64.rpm

Command-Line Switches :

You can have a complete list of command lines if you do “man axel” or “axel –help” but here we mention a few of usable command lines for general usages.

--max-speed=x           -s x    Specify maximum speed (bytes per second)
--num-connections=x     -n x    Specify maximum number of connections
--output=f              -o f    Specify local output file
--header=x              -H x    Add header string
--user-agent=x          -U x    Set user agent
--no-proxy              -N      Just don't use any proxy server
--quiet                 -q      Leave stdout alone
--verbose               -v      More status information

Examples :
– Downloads with max number of connections set to 10
axel -n 10 http://cachefly.cachefly.net/200mb.test

– Downloads at 512,000 Bytes/second (500KB/s) and max 10 connections
axel -s 512000 -n 10 http://cachefly.cachefly.net/200mb.test

Generally you can see about %88 percentage improvement in download speeds with Axel than Wget .

Hope this article was clear and usable for you.

Let me know your opinions in comment.

Thanks.

HugeServer expands to Florida !

HugeServer Networks, LLC expands dedicated server and colocation service offering to Jacksonville ,Florida (East Cost U.S)

Jacksonville,FL was choosen for it’s advantages in providing lower latency network connectivity in higher performance grade to East Coast US and South America , focused on Brasil and the Caribbean. it’s also offer lower latency to European customers.

Our network at Jacksonville,FL has two diverse rings from Atlanta,GA and Miami,FL which offers incredible network uptime ,reliability and performance.

We have three transit carriers in our Jacksonville location including : TWTelecom , nLayer and Level3 Communications . also our network is Noction IRP Optimized which is a great value . Noction IRP analyze and optimize traffic routes in real-time and decrease latency up to %30 for outbound routes !

The facility is a SSAE16 certified Data Center, the most secured Data center in Florida and it’s protected 24×7 by armed officers.

In addition to Jacksonville,FL HugeServer also offers dedicated server and Colocation services in Los Angeles,CA and Atlanta,GA .

For more information, please contact HugeServer at:

Website: www.hugeserver.com
Phone: 1-888-842-8570
Email: sales@HugeServer.com